Colors to me represent the most enticing and fun part of makeup. I’m easily drawn to the exquisite color combination and blending wonders imparted by talented makeup artists on their clients and models. It’s tremendously incredible to see how a creative and tasteful selection of colors translate into a beautiful work of art on people. Without a doubt I am definitely still a novice at eye makeup and the whole color play and blending work. But I’m just so pumped to work on my skills and create decent looks that I have decided to share it and you know, take it a bit more seriously. So this new series “Color Up“ will henceforth be a feature on eye makeup that I did. Details of the specific products and tools used would be provided, along with the best explanation I could give to illustrate my techniques and application (No, I do not see myself doing a YouTube video for this, at least not anytime soon). I hope you’d enjoy the series!
So for the first publication from this category, I’m doing a feature on the Stila Magnificent Metals Glitter & Glow Liquid Eyeshadow. My friends would know how much I rave about this product till it secured a spot in my Holy Grail series. If you haven’t read that post, it will appear right after this one or you can simply click https://sitihajaresa.wordpress.com/2017/05/10/holy-grail-stila-magnificent-metals-glitter-glow-liquid-eyeshadow/. I figured since I sang high praises of this product, I would love to share with you how I’ve used it. The Stila Magnificent Metals Glitter & Glow Liquid Eyeshadow was actually featured once in my Look of the Day series (https://sitihajaresa.wordpress.com/2017/03/07/look-of-the-day-glitter-glow/). But this look is a bit more intense than the previous one. So, let’s start!
The Look

So the look I’ve done is sort of a halo eye effect, with darker shades around the corners, and the glitter popping in the center. This is truly my first attempt at a halo eye makeup so apologies if it looks a bit too amateurish. For this series, I would first share the tools and products I used for the look, and following that the techniques, and finally an alternative lip color to go with.
The Tools
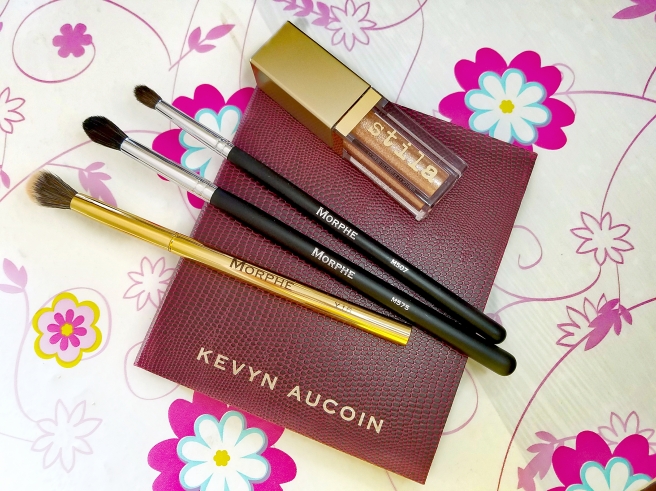
The key tools I used for this look (omitting standard short shader and detailer brushes I used for lower lashline, brow bone and inner corner highlight) are pretty standard buffing and blending brushes, of varying sizes. The closer I get to the lashline the smaller the brushes used. To buff out my transition color, I used the Morphe Y16. For a more targeted crease blending, I used Morphe M575 and lastly Morphe M507 to deposit and blend colors in the outer and inner third of my eyes.
The Colors

Above are swatches of the colors I used, along with specific shade names on top of the swatches and the product listed below the swatches. You do not have to have the specific products I used to recreate the look. The reason I included the swatches is so that you can attempt to find similar colors that you own to emulate the eye makeup. I swatched these using a standard shadow brush instead of my fingers so that you’d have a more realistic idea of how the color would appear on your eyes when you actually apply them with brushes.
The Application
As with all my eye makeup, I do apply a primer beforehand. I switch between the Urban Decay Primer Potion and my Make Up For Ever Full Cover Concealer, but I’ve been reaching out for the latter much more lately, and for this look as well. I then set my primer using the matte white shade “Heaven” from my Too Faced Natural Matte palette. You can use any bone colored eyeshadow for this. I use the white matte shade primarily to set the area above my crease so that the transition color will blend better. Since I am using a liquid eyeshadow in the center of my eyes, I avoid bringing “Heaven” down to my lids since a liquid consistency adheres better to a tacky surface than a powdery one.
Next I wanted a transition color as a bridge between the glitter and the upper areas of my eyes. I just went in with my Marc Jacobs “Tantric” Bronzer, because it was right there on my vanity and on top of being a gorgeous bronzer, it is also a perfect transition color for me. You can use any light tan or even taupe if you please. This transition color can lean both ways, cool or warm because the other colors that I’ll be placing are rather neutral in undertone. I buff “Tantric” with my Morphe Y16, placing it above my crease and blowing up the color in that area using windshield wiper motion, and small circular motion to really diffuse the color. This is kinda my trick since I have hooded eyes, that I’ll place transition colors way above instead of on my crease so that whatever colors that are supposed to be on the lid can be placed a bit higher so that these colors can be seen when I open my eyes. Next, with the same color “Tantric”, I switch to my Morphe M575, this time placing the color right into my crease to deepen it slightly, also using windshield wiper motion to give a little bit of a natural crease contour.
Then I switch to the smallest brush, the Morphe M507 and now using “Ruddy Earth” from Kevyn Aucoin I deposit the color on the outer and inner third of my eyes, using a mixture of patting and small blending motions, emphasizing more on the outer third. This helps to add the dimension for the halo eye effect so that the glitter in the center will pop. Patting also helps to deposit more color. Be sure not to bring “Ruddy Earth” too high up, just stop at your crease or else your eyes might look like it’s been punched. Then going back to a fluffy blending brush (Morphe Y16), I buff out the edges, to diffuse the colors on my crease. Keep going back and forth with “Ruddy Earth” and buffing out of the crease till you’re satisfied with the intensity.
Now for the fun part! Apply the Stila Magnificent Metals Glitter & Glow Liquid Eyeshadow, preferably using a champagne shade with silver and copper sparkles or any other that you feel complements the rest of the colors well. You don’t want your glitter color to be too dark or else you might not be able to see the halo effect. I applied “Kitten Karma” on the center of my lid, packing it on the lid and gradually fading up to above my crease area to give a beautiful gradient effect. I just used the applicator to apply, and gently blending the edges with a q tip. You do not want to go hard on buffing this because the glitter will get displaced if you do.
I then applied a cocoa colored cream liner from ELF, using a slanted liner brush. To highlight my brow bone I used a luminous pearl color “Brighten” from my Kevyn Aucoin Contour Book. Then for the inner corners of my eyes, I applied a shimmery champagne color which is the second shade from the second row of my Carli Bybel x BH Cosmetics palette.
For the lower lashline, I used a liner brush to apply “Ruddy Earth” on my waterline, then buffing it out with a short shader brush using “Tantric”. I then applied “Kitten Karma” in the center, to kind of mirror what was done above.
For the lips, I would go for a matte finish so that the glitz would be focused on the eyes. A reflective or glossy finish may be a bit too competing given the intense eyes. As in the look above, you can pair this with a classy nude lip. I used NYX Soft Matte Lip Cream in the shade “Abu Dhabi” (deep rose-beige).
Otherwise, you can also glam up the look by going bold with a warm red lip!
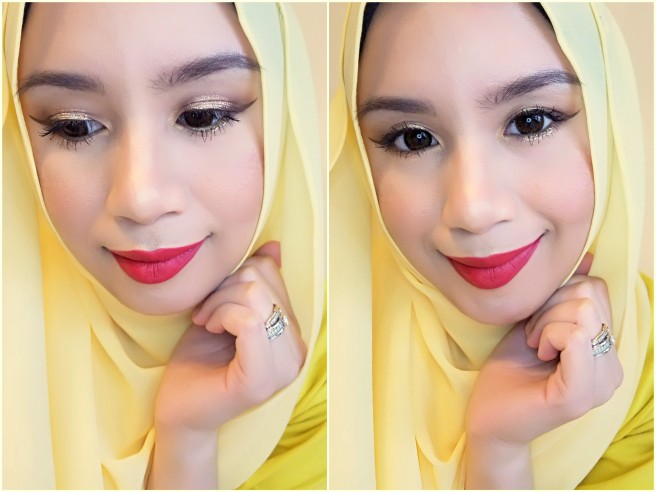
Here, I used “O.G. Red” from MILK Makeup Lip Color.
So, that’s the look guys! I hope you enjoyed this post and are not confused by my explanations. I tried my best to vividly illustrate my techniques. As usual, I look forward to your suggestions. Till the next one!
